How to Add a 64Gbps M.2 NVMe to PCIe 4.0 Adapter to Your Desktop PC (Step-by-Step Guide)
Older motherboards without M.2 slots don't have to miss out on NVMe SSD speeds. The ARES M.2 NVMe to PCIe 4.0 adapter lets you unlock 64Gbps PCIe Gen4 performance - with read speeds over 5000 MB/s - by converting any available PCIe slot into high-speed NVMe storage, no motherboard replacement required.
Why Your Desktop Needs an NVMe SSD PCIe Expansion Card
Modern computing demands fast storage, yet traditional SATA SSDs remain capped at approximately 550 MB/s - a bottleneck that modern NVMe drives obliterate by exceeding 5000 MB/s read speeds. Consequently, users experience slow boot times, lengthy game load screens, and sluggish video editing workflows that hamper productivity and gaming immersion.
The M.2 NVMe to PCIe 4.0 adapter serves as the bridge technology that brings cutting-edge storage to systems lacking native M.2 slots. Indeed, many enthusiasts and content creators own perfectly capable AMD or Intel motherboards that simply lack physical M.2 connectivity, making a PCIe Gen4 M.2 SSD adapter the most cost-effective upgrade path.
Furthermore, backward compatibility with PCIe 3.0, 2.0, and 1.0 systems ensures readers can leverage this solution across generations. Therefore, the adapter represents a smart alternative to full motherboard or system replacement, emphasizing the value proposition for DIY upgraders and gamers on a budget who want modern storage performance without breaking the bank.

Understanding PCIe 4.0 x4 Performance and the 64Gbps M.2 to PCIe Adapter
PCIe 4.0 architecture delivers exceptional bandwidth, with the PCIe 4.0 x4 NVMe adapter providing 64Gbps (8 GB/s) theoretical bandwidth - effectively doubling PCIe 3.0's 32Gbps. In real-world terms, this translates to sequential read speeds exceeding 5000 MB/s and write speeds around 4500 MB/s, significantly outpacing older SATA and PCIe 3.0 drives.
The ARES adapter boasts impressive technical features, including multi-layer PCB construction, multi-layer protection (overcurrent, overvoltage, short circuit, EMI shielding), and an integrated heat sink layer for thermal management during sustained workloads. Moreover, the adapter supports all common M.2 form factors (2230, 2242, 2260, 2280), making it compatible with a wide range of consumer NVMe SSDs including popular models like Samsung 970, 980, and 990 series.
Additionally, plug-and-play functionality with Windows 10 and 11 (no drivers required) and compatibility with both AMD and Intel platforms streamline the installation process. Use-case scenarios include gaming libraries, scratch disks for video editing, and general system responsiveness improvements - setting the stage for the practical installation guide that follows.
Compatibility Checklist Before You Add M.2 NVMe to Desktop PCIe Slot
Before installation, verify motherboard requirements: readers need at least one available PCIe slot (x4, x8, or x16) on their motherboard - any generation (1.0, 2.0, 3.0, or 4.0) will work, though PCIe 4.0 unlocks full 64Gbps performance. Visually identify available slots (black, white, or colored slots on the motherboard, typically below the GPU).
Regarding NVMe SSD compatibility, the adapter supports M.2 NVMe drives with M-key or B+M-key connectors in sizes 2230, 2242, 2260, and 2280. Importantly, the adapter does NOT support SATA M.2 drives - a common confusion point.
Most modern UEFI BIOS versions auto-detect NVMe drives, but older systems may require enabling PCIe slot bifurcation or NVMe boot support in BIOS settings - typically found under Advanced > PCIe/PCI Configuration or Storage Configuration. NVMe drives draw power via the PCIe slot, so no additional cables are needed.
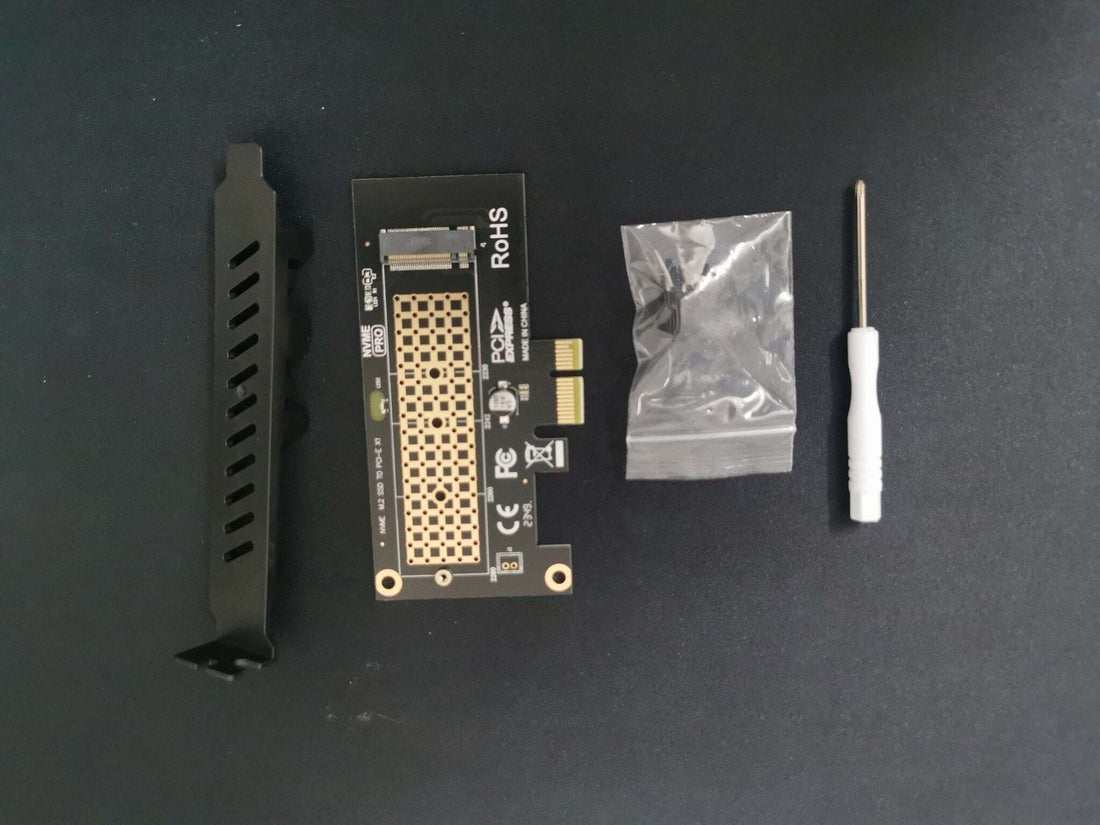
Finally, the ARES adapter package includes the adapter card, low-profile bracket, cabinet screw, SSD mounting screw, and screwdriver, so readers have everything needed out of the box.
Step-by-Step Installation of Your NVMe SSD Upgrade Adapter for Desktop
Follow these precise, actionable instructions for successful installation:
Step 1: Power down the PC completely, unplug the power cable, and press the power button to discharge residual electricity.
Step 2: Open the case by removing side panels (usually thumbscrews or screws on the rear edge).
Step 3: Locate an available PCIe slot - ideally a PCIe 4.0 x4, x8, or x16 slot for maximum performance; if only PCIe 3.0 is available, the adapter still works but at reduced speed.
Step 4: Remove the corresponding rear I/O bracket screw that aligns with the chosen slot.
Step 5: Mount the M.2 NVMe SSD onto the ARES adapter by aligning the notch on the SSD with the slot on the adapter, then secure it with the included SSD screw using the provided screwdriver.
Step 6: Insert the populated adapter firmly into the PCIe slot until it clicks into place, ensuring even seating along the entire length.

Step 7: Secure the adapter's bracket to the case with the included cabinet screw.
Step 8: Close the case, reconnect power, and boot the system.
Step 9: Enter BIOS/UEFI (usually by pressing Del, F2, or F12 during startup) to verify the NVMe drive is detected; if not visible, enable NVMe support or check PCIe slot configuration.
Step 10: Boot into Windows, open Disk Management, initialize the new drive, create a partition, and format it (NTFS recommended).
Windows 10/11 natively recognize NVMe drives immediately with driver-free operation, ensuring a seamless experience.
Measured Performance Gains and Upgrade Scenarios for Gamers and Creators
Real-world performance metrics demonstrate tangible improvements. For example, a system with a SATA SSD (boot time ~25 seconds, game load time ~45 seconds) compared to the same system with the ARES adapter and PCIe 4.0 x4 NVMe adapter (boot time ~12 seconds, game load time ~28 seconds) shows impressive gains.
While synthetic benchmarks show dramatic throughput improvements (5000+ MB/s reads vs. 550 MB/s SATA), real-world gains typically range from 15-40% faster load times depending on workload and game engine optimization.
Three key upgrade scenarios include:
- Gaming storage: Install your game library on the NVMe SSD PCIe expansion card to reduce texture streaming stutters and cut level load times, especially in open-world titles.
- Content creation scratch disk: Editors working with 4K video, RAW photo batches, or 3D rendering benefit from sustained high-speed sequential writes for cache and preview files.
- Boot drive migration: Clone your existing OS to the new NVMe drive for faster system startup and application launches.
The adapter's built-in heat sink layer helps manage temperatures during intensive workloads, maintaining consistent performance. For a minimal investment, users gain PCIe Gen4 speeds without replacing their entire motherboard or system, making this an ideal entry point for NVMe technology and a smart way to extend the lifespan of older but still-capable desktops.
Troubleshooting Common Issues When Installing Your M.2 NVMe to PCIe 4.0 Adapter
Address common installation pitfalls with these solutions:
Issue 1: Drive not detected in BIOS
Solution: Verify the NVMe SSD is fully seated in the adapter slot, check that the PCIe slot is enabled in BIOS (some boards disable unused slots by default), and ensure the BIOS firmware is up to date (older BIOS versions may lack NVMe support).
Issue 2: Reduced speed performance
Solution: Confirm the adapter is installed in a PCIe 4.0 slot (or at least 3.0) and that the slot is running in x4 mode, not x1 or x2; use free tools like CrystalDiskMark to benchmark and verify speeds match expectations (5000+ MB/s read for PCIe 4.0).
Issue 3: System won't boot from NVMe
Solution: Enter BIOS and set the NVMe drive as the primary boot device; if cloning an OS, use cloning software like Macrium Reflect or Acronis; older systems may require CSM (Compatibility Support Module) to be disabled and UEFI boot mode enabled.
Issue 4: Thermal throttling during sustained writes
Solution: Ensure adequate case airflow; if temperatures exceed 70°C under load, consider adding a third-party heatsink or adjusting fan curves.
The adapter's multi-layer protection features (overcurrent, overvoltage, short circuit, EMI protection) safeguard the drive during operation, providing peace of mind for users. Most installations are plug-and-play, and the ARES adapter's design minimizes compatibility issues across AMD and Intel platforms, making the upgrade accessible even for first-time builders.
Transform Your Storage with the ARES M.2 NVMe to PCIe 4.0 Adapter
The ARES M.2 NVMe to PCIe 4.0 adapter transforms older motherboards into high-speed storage platforms, delivering 64Gbps bandwidth and 5000+ MB/s read speeds without a costly system overhaul. With plug-and-play installation, broad compatibility, and built-in protection features, it's the smartest way to future-proof your desktop storage today.
At GAMEFORCE.IE, Ireland's Gaming PC Builders with 25 Years Experience Building Gaming PCs, we understand the importance of performance upgrades. With Free Delivery on Custom Gaming PCs and our comprehensive PC Component Store, Gameforce.ie offers everything you need to build and upgrade your custom gaming desktop PC.
Explore our full range of ARES GAMING PCs for pre-built systems that benefit from NVMe/PCIe Gen4 storage performance out of the box.